Workspace
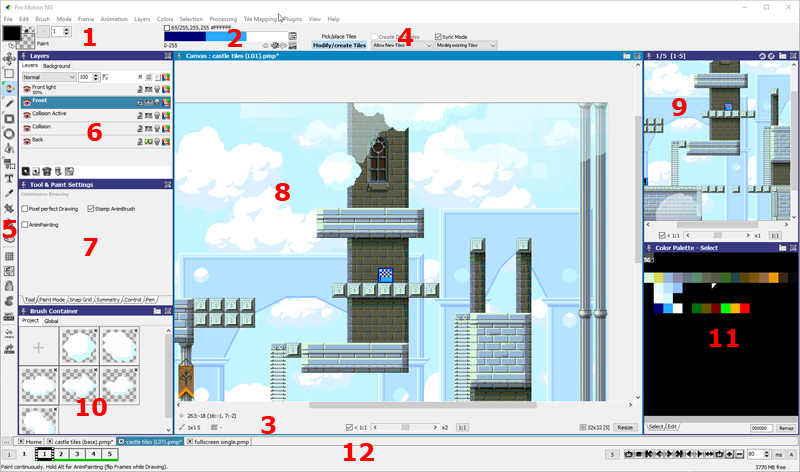
This is a snapshot of the Pro Motion workspace. See the numbered areas to get more information.
1: Paint Mode Area
In this area you find first and second color selectors as well as a transparency selector to draw with a transparent color.You can also select a default brush like round or rectangle and change its size.
If using alpha transparency you can set up the opacity that is used for drawing. For more information about alpha please read the alpha primer.
2: Gradient Panel
The gradient panel displays the currently selected gradient which is a defined range of colors within the color palette. They can be used for different drawing effects and fills. See the gradient editor for more information.Double click to choose different gradients.
The icon buttons can be used to flip the color order, enable color cycling, start color cycling playback and enable the gradient for multi shade paint mode.
3: Information Panel
The information panel provides you different information about the brush size and the brush positions (top left, center, lower right) as well as dimensions when you draw an object (e.g. a rectangle).4: Tile Mapping Panel
Here you can find options and functions when using tile map projects. Tile maps are images made up of small tiles of a certain size, e.g. 8x8 or 16x16 pixels. An image is then built by an underlying map that contains tile numbers that refer to a list of defined tiles (tile set).Please read the tile mapping primer for more information.
5: Tool box
Find different drawing tools and options to be activated.Please read the tool box section for more information.
6: Layers
In that window you can define and arrange your image and animation layers.7: Tool and Paint settings
In this window you will find options for the current tool as well as additional settings for e.g. paint modes, snap grid or pen pressure settings.8: Canvas Window
The canvas window is mainly used to draw and to zoom into the image. The zoom level can be selected using the slider at the lower left.You can lock the zoom value to a minimum of 1:1 using the checkbox on the left.
Use the options icon in the window's title bar to access different options:
Pan around Canvas will use pan area around the canvas so that you can move the image corners to the center.
Follow Preview Window follows the navigation movements of the Animation/Preview Window.
Auto Scrolling certain tools such as the Line Tool automatically scroll the canvas if you are moving out of range. Disable that option to prevent such kind of scrolling.
Show Animation Playback uses the canvas window to play the animation instead of the preview window.
Show Light Table if the light table is enabled then it shows the light table onion skinning in the magnify window.
Transparent makes the canvas 50% transparent to show applications or views underneath. This can be used to display reference graphics and draw them like with a light table.
9: Animation/Preview Window
Use the second view where animations are played back or previews at a different zoom level.10: Brush Container
In addition to the magnify window there is a brush container to store and reuse brushes.11: Color Palette
Use the color palette editor to select, arrange and modify your indexed colors.12: Lower Control Panel
The lower control area divides into the project tabs area, the controls for animation and the status line.The project tabs can be used to switch between different projects. The animation controls are described here.
The status line displays information about the selected tool and how to use it.
Related topics
Animation Control PanelGetting started
Gradient Editor
Contents
Pen Settings
Preferences
Toolbox
Last modified: 29 January 2023
